Industrial Computed Tomography (CT) Scanning Services
What Is Advanced Metrology-Grade Industrial Computed Tomography (CT) Scanning & Voxel Analysis?
Industrial CT scanning uses X-ray images captured from many angles to construct a virtual 3D image of the object being scanned. Several thousand X-rays are taken as the part rotates in the machine. Afterward, those X-ray images go through a reconstruction process that takes the 2D images from the X-ray tube and combines them to calculate a 3D volume called a voxel data set. A voxel is an internal structure that is cube-shaped and stands for ‘VOlumetric piXEL’. There are millions of voxels that make up a data set. Each contains information such as its location, size and a greyscale value that represents the ability of that element to abate X-rays. To completely ensure your x-rays are free of industrial flaws in the x-ray data, inspection services can follow the computed tomography (CT) process.
Non-Contact Data Collection
This virtual mapping of the object being scanned (including the air space surrounding and inside the object), is the basis of what we use to visualize and measure the object. Industrial scanning computed tomography (CT) is the leading-edge technology for touchless data collection technology. Full assemblies can be scanned without disassembly! So you can capture data on internal stressed components in their assembled state. Solids, liquids and gases can be distinguished from each other as well. 3D Engineering Solutions industrial CT scanning services are able to capture what has never before been available to the industry – the precise dimensions of internal and external structures captured in a non-destructive fashion. This includes porosity and inclusions on the internal material of the object itself. Industrial CT scanning also excels at capturing obscured internal and external features which line-of-sight data collection methods such as laser and structured light scanning are not able to.
Once the data is captured, you have the option of virtually disassembling an assembly to see and measure each component in its compressed assembled state. This non-destructive testing method is unparalleled in its ability to do this and far exceeds traditional destructive methods that require mounting and preparing cross-sectioned samples. Once the dataset is obtained, you can create as many virtual slices as desired. Inspection services can follow up the scanning services process and confidence in the technology of the industrial accuracy of your x-ray data. This technology provides medical information on the computed tomography process for an in-depth analysis.
Full Industrial CT Scanning Equipment
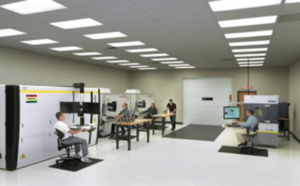
Highly specialized equipment is used in medical Industrial CT Scanning services. We employ the best available industrial CT scanning equipment. As a metrology and engineering services provider only, we are not bound to purchasing or using any particular equipment due to a commission arrangement with the manufacturer. So we are free to pick the current best equipment on the market for your project. Each piece of equipment that we maintain is OEM equipment and is maintained by service agreements with the OEM for optimal uptime. We need each piece and part of equipment available for use on your project as you need it. So we do not purchase or assemble ‘one of a kind’ equipment for use in our service business. You will note on each quote and report, the exact make and model being used for your industrial CT scanning services project. This helps assure you or your end customer of the validity and repeatability of our results in our industrial CT and x-ray services.
3D Engineering Solutions employs CT scanners that cover a range of application needs from tiny delicate parts to large Inconel aerospace parts. As a service provider, we see the full spectrum of x-ray computed tomography scanning requirements and have a depth of experience in processing all of them. Our scanning services technology ultimately aims to get an in-depth, internal look at the object being scanned.
Our 160kV XTV Nikon machine is superior for capturing fine detail in components. Its sub-micron spot size yields incredible detail. This combined with its ability to 3D scan objects with high aspect ratios (think printed circuit boards [PCBs] which are wide but thin) through X.Tract (laminography), makes what is normally not possible for CT a reality. Each CT machine is also an X-ray machine and can be used for live X-ray movies of assemblies as they are being actuated. This particular machine is especially useful and most frequently used by the PCB industry for x-raying BGAs, other components, solder pads and the like. After the CT scanning process is completed, inspection services can be followed in order to ensure no faults were made during the x-ray. Time and money can be saved through an internal inspection and checking possible mistakes during the x-ray process and will guarantee accuracy giving you confidence in your CT scanning services results.
Scanning Environment
The 225kV MCT Nikon machines that we use are advanced metrology-grade CT scanners. These are not the standard 225kV machines that are available, but are packed full of technology to control the scanning environment to a degree unheard of in the past from traditional industrial CT scanners. Both of our MCT machines are on our ISO17025 scope of accreditation and as such we have developed measurement uncertainties around this process. These metrology grade computed tomography systems establish maximum permissible error (MPE) values per VDI 2630 guaranteeing accuracies for critically toleranced components. We find these machines highly reliable and repeatable when compared with our other in-house CMMs. These MCT machines employ 16” detector panels are the largest in the industry. These 16” detector panels allow us to resolve the best level of detail for your project. Our metrology grade systems provide reliable technology that gives us accurate results on internal structures. Tasks like failure analysis, defect analysis, and wall thickness analysis can all become easier to manage.
3DES’ 450kV micro-focus Nikon system sports dual detectors (16” panel and proprietary curved linear diode array – CLDA) and generous cabinet space for larger parts. 3D Engineering Solutions features Nikon’s XTH 450kV micro-focus CT with patented technology that allows the smallest spot size available in this size of machine anywhere. Combined with a low noise CLDA detector, the 450kV micro-focus CT allows us to generate brilliant and crisp CT scans of even the most difficult parts. What this means for our customers is incredible detail in dense or thick parts that was not possible before. Our machine provides the highest accuracy with power enough for larger/denser parts including difficult Aerospace materials.
All of our CT data is processed with the premiere CT scanning software from Volume Graphics. VG Studio Max and its multiplicity of accessory modules are used to parse the voxel data better than other software. Because Volume Graphics has a single focus on CT analysis software development, they have generated an analysis package that is unbeaten by its competitors. This has led to their unmistaken leadership in the market and the reason that we chose them as our CT scanning analysis software of choice.
3D Engineering Solutions Strategy
3D Engineering Solutions employs a similar strategy through its metrology and engineering services only model. Since we only sell a service and are not trying to sell equipment or software, we have become very good at providing engineering services. Because we do not have a split focus, our work is precise, timely and impeccable. We hire degreed engineers and train them in CT and each of the other technologies we employ. So each project that is performed for you has a depth of experience from degreed engineers performing the work. The majority of our customers are engineers. We find that an engineer talking directly to other engineers yields the best and most complete communication. Each of our staff has been individually trained by our NAS410 level 3 who had also worked for Volume Graphics as a trainer. And as with all of our staff, our level 3 has been trained by others on the other technologies we employ. Each person in our team has the knowledge and experience to provide you a complete job.
Since we have a large staff of engineers, we can also support larger CT jobs. Being service oriented, we can support 24/7 CT scanning and data processing through our 4 onsite CT scanning machines and multiple VG Studio Max seats. We understand that you cannot always wait long periods of time for your data, but have critical needs that require more expeditious results. Our large trained staff allows us to avoid potential personnel availability issues when your job comes to us. Precision and time efficiency in our industrial x-ray and CT scanning services are unmatched to our competitors in the industry.
Our motto is measuring and modeling quality. We want to earn your business. Please contact us for your CT scanning, inspection, reverse engineering and analysis needs.

